Image by Author
In this tutorial, we will learn how to set up and use the OpenAI API for various use cases. The tutorial is designed to be easy to follow, even for those with limited knowledge of Python programming. We’ll explore how anyone can generate responses and access high-quality large language models.
The OpenAI API allows developers to easily access a wide range of AI models developed by OpenAI. It provides a user-friendly interface that enables developers to incorporate intelligent features powered by state-of-the-art OpenAI models into their applications. The API can be used for various purposes, including text generation, multi-turn chat, embeddings, transcription, translation, text-to-speech, image understanding, and image generation. Additionally, the API is compatible with curl, Python, and Node.js.
To get started with OpenAI API, you first need to create an account on openai.com. Previously, every user was given free credit, but now new users are required to purchase credit.
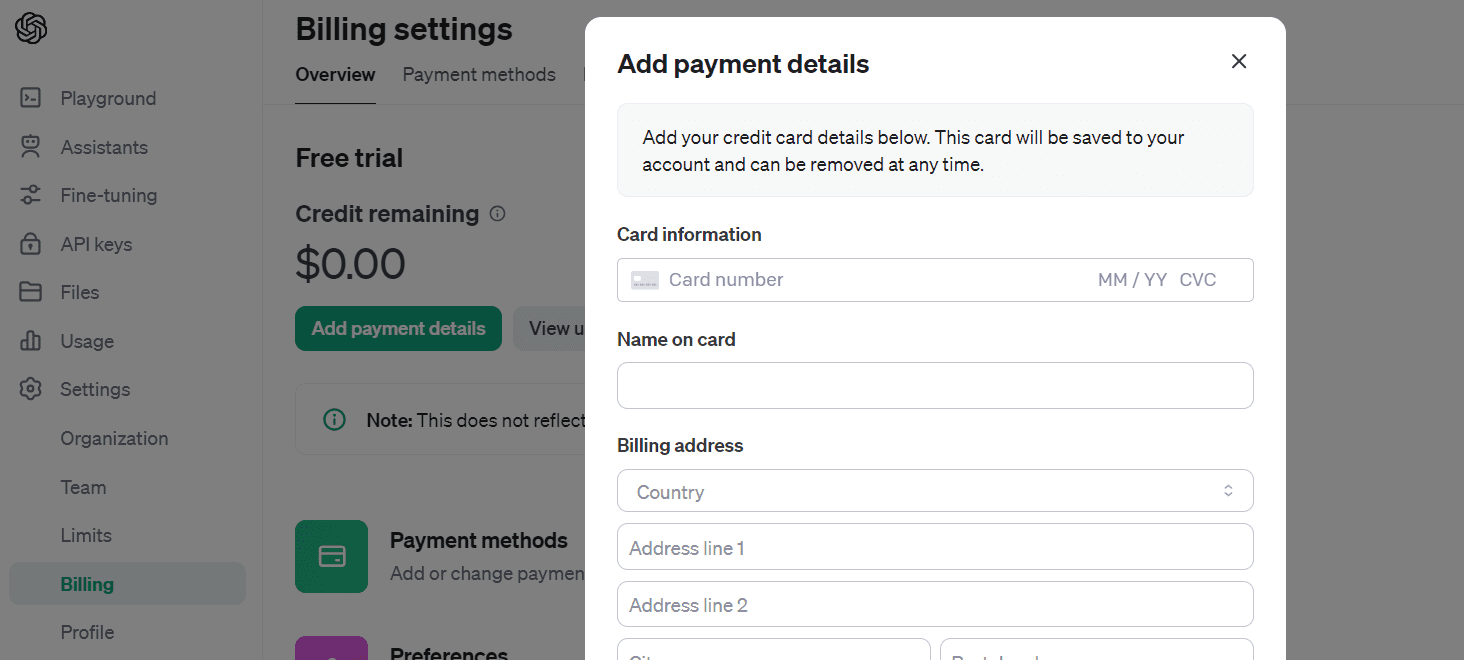
To purchase credit, go to “Settings,” then “Billing,” and finally, “Add Payment Details.” Enter your debit or credit card information, and make sure to disable auto-recharge. Once you have loaded 10 USD, you can use it for a year.
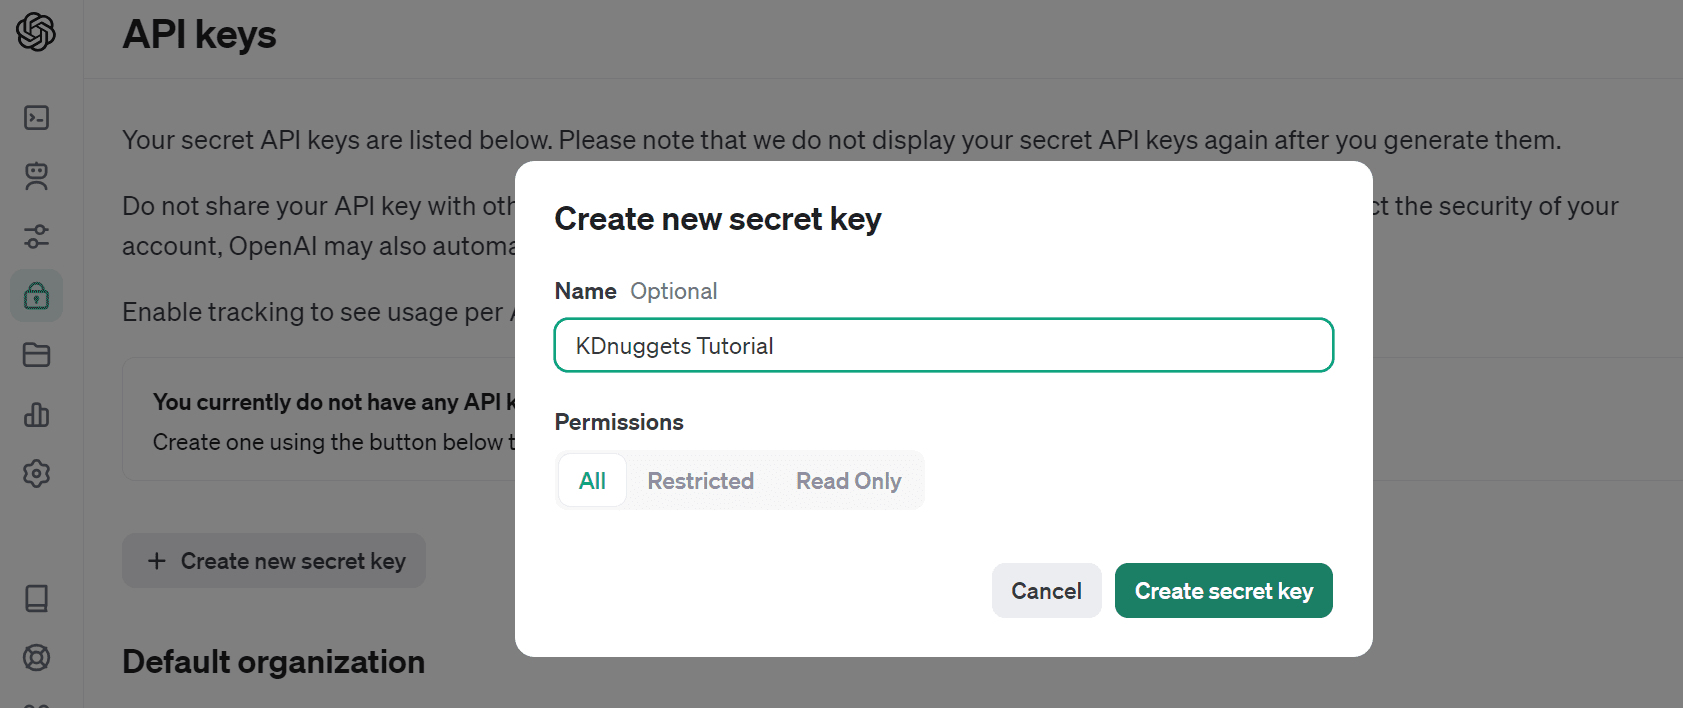
Let’s create the API key by navigating to “API keys” and selecting “Create new secret key”. Give it a name and click on “Create secret key”.
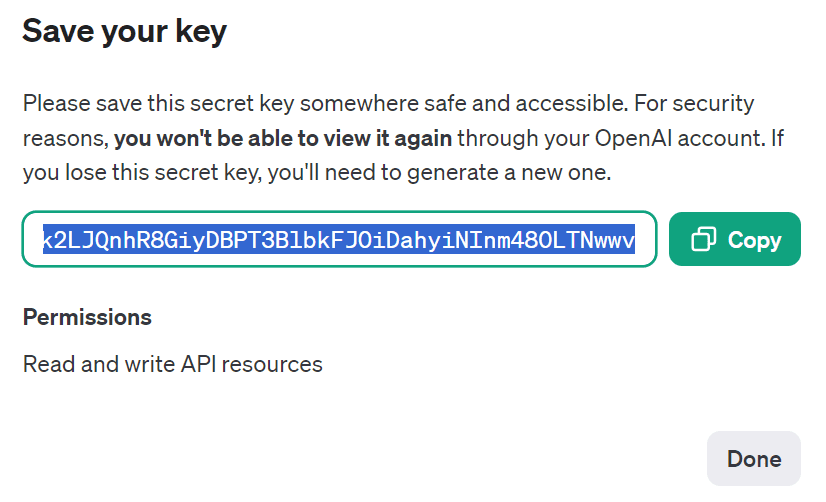
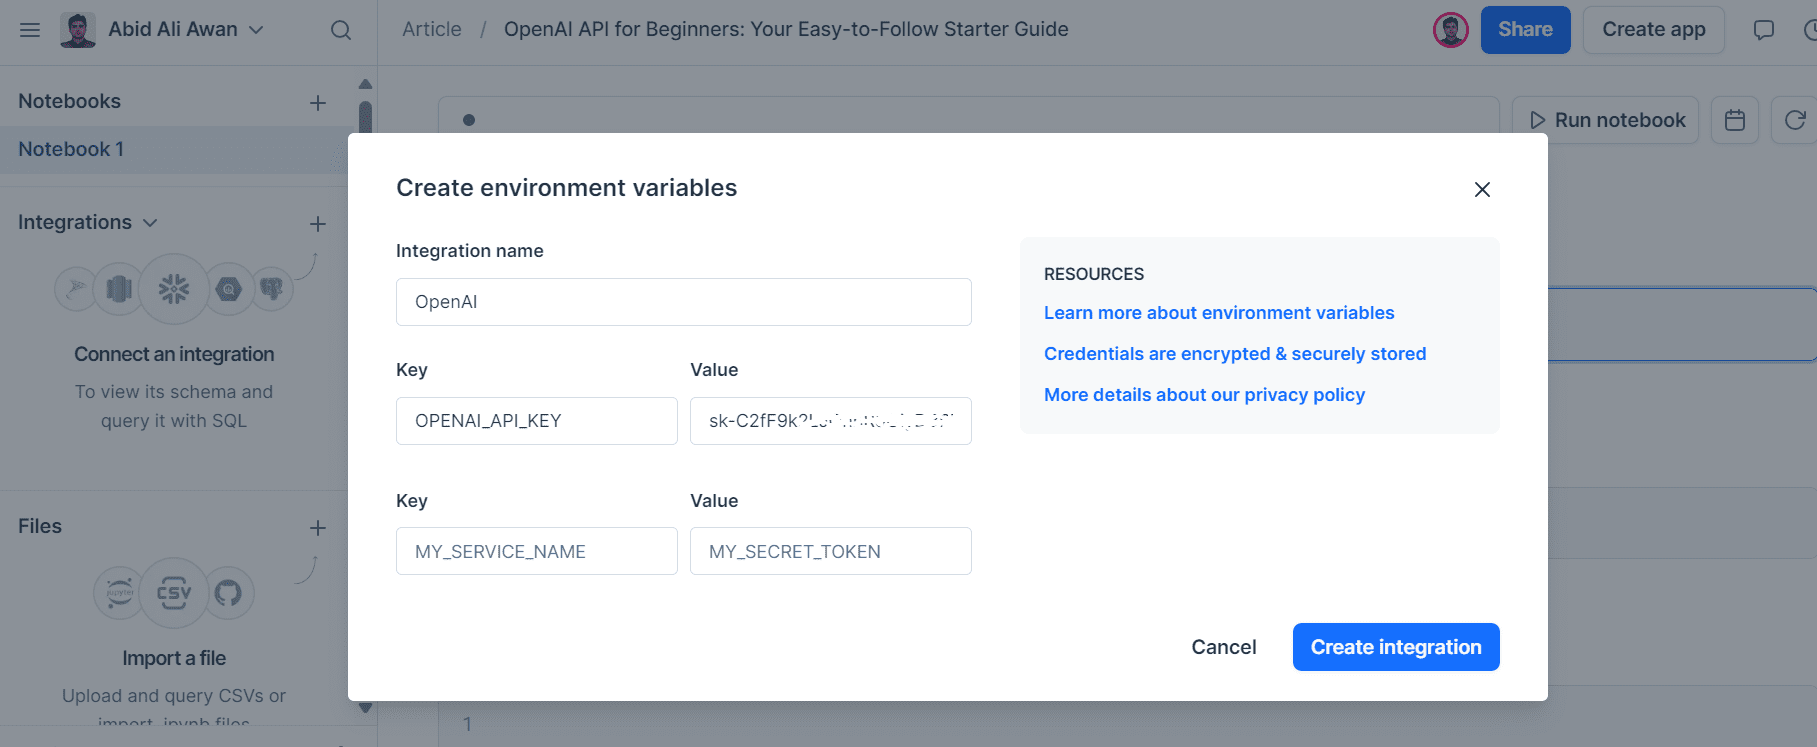
Copy the API and create an Environment variable at the local machine.
I use Deepnote as my IDE. It’s easy to create environment variables. Simply go to “Integration”, select “create environment variable”, provide a name and value for the key, and create the integration.
Next, we will Install the OpenAI Python package using pip.
%pip install –upgrade openai
We will now create a client that can access various types of models globally.
If you have set your environment variable with the name “OPENAI_API_KEY”, you don’t need to provide the OpenAI client with an API key.
from openai import OpenAI
client = OpenAI()
Please note that you should only provide an API key if the name of your environment variable is different from the default one.
import os
from openai import OpenAI
client = OpenAI(
api_key=os.environ.get(“SECRET_KEY”),
)
We will use a legacy function to generate the response. The completion function requires the model name, prompt, and other arguments to generate the reply.
completion = client.completions.create(
model=”gpt-3.5-turbo-instruct”,
prompt=”Write a short story about Elon Musk being the biggest troll.”,
max_tokens=300,
temperature=0.7,
)
print(completion.choices[0].text)
The GPT3.5 model have generate amazing story about Elon Musk.

We can also stream our response by providing an extra argument `stream`.
Instead of waiting for the complete response, the stream feature enables processing of output as soon as it’s generated. This approach helps to reduce perceived latency by returning the output of the language model token by token rather than all at once.
stream = client.completions.create(
model=”gpt-3.5-turbo-instruct”,
prompt=”Write a Python code for accessing the REST API securely.”,
max_tokens=300,
temperature=0.7,
stream = True
)
for chunk in stream:
print(chunk.choices[0].text, end=””)

The model used API chat completion. Before generating the response, let’s explore the available models.
You can view the list of all models available or read the Models page on the official documentation.
print(client.models.list())

We will use the latest version of GPT-3.5 and provide it with a list of a dictionary for system prompts and user messages. Make sure to follow the same message pattern.
completion = client.chat.completions.create(
model=”gpt-3.5-turbo-1106″,
messages=[
{
“role”: “system”,
“content”: “You are an experienced data scientist, adept at presenting complex data concepts with creativity.”,
},
{
“role”: “user”,
“content”: “What is Feature Engineering, and what are some common methods?”,
},
],
)
print(completion.choices[0].message.content)
As we can see, we have generated a similar result as the legacy API. So, why use this API? Next, we will learn why the chat completion API is more flexible and easier to use.
Feature engineering is the process of selecting, creating, or transforming features (variables) in a dataset to improve the performance of machine learning models. It involves identifying the most relevant and informative features and preparing them for model training. Effective feature engineering can significantly enhance the predictive power of a model and its ability to generalize to new data.
Some common methods of feature engineering include:
1. Imputation: Handling missing values in features by filling them in with meaningful values such as the mean, median, or mode of the feature.
2. One-Hot Encoding: Converting categorical variables into binary vectors to represent different categories as individual features.
3. Normalization/Standardization: Scaling numerical features to bring t………
We will now learn how to have a multi-turn conversation with our AI model. To do this, we will add the assistant’s response to the previous conversation and also include the new prompt in the same message format. After that, we will provide a list of dictionaries to the chat completion function.
chat=[
{“role”: “system”, “content”: “You are an experienced data scientist, adept at presenting complex data concepts with creativity.”},
{“role”: “user”, “content”: “What is Feature Engineering, and what are some common methods?”}
]
chat.append({“role”: “assistant”, “content”: str(completion.choices[0].message.content)})
chat.append({“role”: “user”, “content”: “Can you summarize it, please?”})
completion = client.chat.completions.create(
model=”gpt-3.5-turbo-1106″,
messages=chat
)
print(completion.choices[0].message.content)
The model has understood the context and summarized the feature engineering for us.
Feature engineering involves selecting, creating, or transforming features in a dataset to enhance the performance of machine learning models. Common methods include handling missing values, converting categorical variables, scaling numerical features, creating new features using interactions and polynomials, selecting important features, extracting time-series and textual features, aggregating information, and reducing feature dimensionality. These techniques aim to improve the model’s predictive power by refining and enriching the input features.
To develop advanced applications, we need to convert text into embeddings. These embeddings are used for similarity search, semantic search, and recommendation engines. We can generate embeddings by providing the API text and model name. It’s that simple.
text = “Data Engineering is a rapidly growing field that focuses on the collection, storage, processing, and analysis of large volumes of structured and unstructured data. It involves various tasks such as data extraction, transformation, loading (ETL), data modeling, database design, and optimization to ensure that data is accessible, accurate, and relevant for decision-making purposes.”
DE_embeddings = client.embeddings.create(input=text, model=”text-embedding-3-small”)
print(chat_embeddings.data[0].embedding)
[0.0016297283582389355, 0.0013418874004855752, 0.04802832752466202, -0.041273657232522964, 0.02150309458374977, 0.004967313259840012,…….]
Now, we can convert text to speech, speech to text, and also translate it using audio API.
Transcriptions
We will be using the Wi-Fi 7 Will Change Everything YouTube video and convert it into mp3. After that, we will open the file and provide it to the audio transcript API.
audio_file= open(“Data/techlinked.mp3”, “rb”)
transcript = client.audio.transcriptions.create(
model=”whisper-1″,
file=audio_file
)
print(transcript.text)
The Whisper model is amazing. It has a perfect transcript the the audio.
The Consumer Electronics Show has officially begun in Las Vegas and we’ll be bringing you all the highlights from right here in our regular studio where it’s safe and clean and not a desert. I hate sand. The Wi-Fi Alliance announced that they have officially confirmed the Wi-Fi 7 standard and they’ve already started to certify devices to ensure they work together. Unlike me and Selena, that was never gonna last. The new standard will have twice the channel bandwidth of Wi-Fi 5, 6, and 6E, making it better for, surprise,……
Translation
We can also transcribe the English audio into another language. In our case, we will be converting it into Urdu language. We will just make add another argument `language` and provide it with ISO language code “ur”.
translations = client.audio.transcriptions.create(
model=”whisper-1″,
response_format=”text”,
language=”ur”,
file=audio_file,
)
print(translations)
The translation for non-Latin languages is imperfect, but usable for a minimum viable product.
کنسومر ایلیکٹرانک شاہی نے لاس بیگیس میں شامل شروع کیا ہے اور ہم آپ کو جمہوری بہترین چیزیں اپنے ریگلر سٹوڈیو میں یہاں جارہے ہیں جہاں یہ آمید ہے اور خوبصورت ہے اور دنیا نہیں ہے مجھے سانڈ بھولتا ہے وائ فائی آلائنٹس نے اعلان کیا کہ انہوں نے وائ فائی سیبن سٹانڈرڈ کو شامل شروع کیا اور انہوں ن……..
Text to Speech
To convert your text into natural-sounding audio, we will use speech API and provide it with the model name, voice actor name, and input text. Next, we will save the audio file to our “Data” folder.
response = client.audio.speech.create(
model=”tts-1″,
voice=”alloy”,
input=””‘I see skies of blue and clouds of white
The bright blessed days, the dark sacred nights
And I think to myself
What a wonderful world
”’
)
response.stream_to_file(“Data/song.mp3”)
To listen to the audio file within the Deepnote Notebook, we will use the IPython Audio function.
from IPython.display import Audio
Audio(“Data/song.mp3”)

The OpenAI API provides users with access to a multimodal model through the chat completion function. To comprehend images, we can use the latest GPT-4 vision model.
In the message argument, we have provided a prompt for asking questions about the image and the image URL. The image is sourced from Pixabay. Please ensure that you follow the same message format to avoid any errors.
response = client.chat.completions.create(
model=”gpt-4-vision-preview”,
messages=[
{
“role”: “user”,
“content”: [
{
“type”: “text”,
“text”: “Could you please identify this image’s contents and provide its location?”,
},
{
“type”: “image_url”,
“image_url”: {
“url”: ”
},
},
],
}
],
max_tokens=300,
)
print(response.choices[0].message.content)
The output perfectly explain the image.
This is an image of a person carrying a large number of rice seedlings on a carrying pole. The individual is wearing a conical hat, commonly used in many parts of Asia as protection from the sun and rain, and is walking through what appears to be a flooded field or a wet area with lush vegetation in the background. The sunlight filtering through the trees creates a serene and somewhat ethereal atmosphere.
It’s difficult to determine the exact location from the image alone, but this type of scene is typically found in rural areas of Southeast Asian countries like Vietnam, Thailand, Cambodia, or the Philippines, where rice farming is a crucial part of the agricultural industry and landscape.
Instead of providing an image URL, we can also load a local image file and provide it to the chat completion API. To do this, we first need to download the image by Manjeet Singh Yadav from pexels.com.
!curl -o /work/Data/indian.jpg ”
Then, we will load the image and encode in base64 format.
import base64
def encode_image(image_path):
with open(image_path, “rb”) as image_file:
return base64.b64encode(image_file.read()).decode(‘utf-8’)
image_path = “Data/indian.jpg”
# generating the base64 string
base64_image = encode_image(image_path)
Instead of providing the image URL, we will provide the metadata and the image’s base64 string.
response = client.chat.completions.create(
model=”gpt-4-vision-preview”,
messages=[
{
“role”: “user”,
“content”: [
{
“type”: “text”,
“text”: “Could you please identify this image’s contents.”,
},
{
“type”: “image_url”,
“image_url”: {
“url”: f”data:image/jpeg;base64,{base64_image}”
},
},
],
}
],
max_tokens=100,
)
print(response.choices[0].message.content)
The model has successfully analyzed the image and provided a detailed explanation about it.
The image shows a woman dressed in traditional Indian attire, specifically a classical Indian saree with gold and white colors, which is commonly associated with the Indian state of Kerala, known as the Kasavu saree. She is adorned with various pieces of traditional Indian jewelry including a maang tikka (a piece of jewelry on her forehead), earrings, nose ring, a choker, and other necklaces, as well as bangles on her wrists.
The woman’s hairstyle features jasmine flowers arranged in
We can also generate images using the DALLE-3 model. We just have to provide model name, prompt, size, quality, and number of images to the images API.
response = client.images.generate(
model=”dall-e-3″,
prompt=”a young woman sitting on the edge of a mountain”,
size=”1024×1024″,
quality=”standard”,
n=1,
)
image_url = response.data[0].url
The generated image is saved online, and you can download it to view it locally. To do this, we will download the image with the `request` function, providing the image URL and the local directory where you want to save it. After that, we will use the Pillow library’s Image function to open and show the image.
import urllib.request
from PIL import Image
urllib.request.urlretrieve(image_url, ‘/work/Data/woman.jpg’)
img = Image.open(‘/work/Data/woman.jpg’)
img.show()
We have received a high-quality generated image. It is simply amazing!

If you are struggling to run any of the OpenAI Python APIs, feel free to check out my project on Deepnote.
I’ve been experimenting with OpenAPI for some time now, and we ended up using only 0.22 dollars in credit, which I find quite affordable. With my guide, even beginners can start building their own AI applications. It’s a simple process – you don’t have to train your own model or deploy it. You can access state-of-the-art models using the API, which is continually improving with each new release.

In this guide, we cover how to set up the OpenAI Python API and generate simple text responses. We also learn about multiturn chat, embeddings, transcription, translation, text-to-speech, vision, and image generation APIs.
Do let me know If you want me to use these APIs to build an advanced AI application.
Thank you for reading.
Abid Ali Awan (@1abidaliawan) is a certified data scientist professional who loves building machine learning models. Currently, he is focusing on content creation and writing technical blogs on machine learning and data science technologies. Abid holds a Master’s degree in technology management and a bachelor’s degree in telecommunication engineering. His vision is to build an AI product using a graph neural network for students struggling with mental illness.


