


Microsoft is betting big on AI. Starting with integrating Bing with ChatGPT, it has implemented AI capabilities in its products. Microsoft Designer is a new product from Microsoft with AI capabilities backed by DALL-E to create images and design stunning images to get eyeballs on social media. This guide will show beginners how to use Microsoft Designer and create stunning images.
How to use Microsoft Designer
If you are just starting on Microsoft Designer, this comprehensive list of what you can do on Microsoft Designer will help you.
- How do I access Microsoft Designer?
- What can I do on Microsoft Designer?
- How to remove the background of an image on Microsoft Designer
- How to generate a brand kit on Microsoft Designer
- How to create social media posts on Microsoft Designer
- Create images and animations with text descriptions in Designer
- Create an animated graphic in Designer
- Use Microsoft Designer Prompts to generate images
- Upload your images to Designer.
Let’s get into each section and know how to do them.
Microsoft Designer Tutorial
How do I access Microsoft Designer?
Microsoft Designer is currently available as a web app only. To start using It, open a web browser on your PC and go to designer.microsoft.com.
Once you are on the Microsoft Designer web page, click on Get started for free at the top-right of the page. It will show a sign-up option. You may skip it by clicking on Skip sign in for now. Signing up comes with the benefit of saving the designs to the account and you can resume working on them anywhere with the connected Microsoft account. To sign up, click on Sign up or sign in.

It will take you to the creative space of Microsoft Designer where you can start using its features and create designs.
What can I do on Microsoft Designer?
You can do the following things on the Microsoft Designer:
- Generate images from your text description using the Image Creator feature.
- Create stickers for messaging apps with Sticker Creator.
- Create designs with your text description using Design Creator.
- Remove backgrounds from images or erase objects.
- Generate brand-kit for your business or brand using Brand Kit Creator.
- Create albums from your memories using the Album Creator.
- Design images for your social media accounts and customize them.
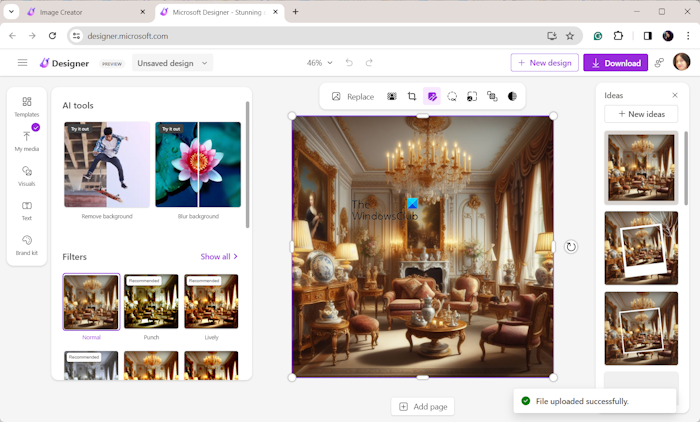
How to remove the background of an image on Microsoft Designer
All it takes is just a few clicks to remove the background of an image on Microsoft Designer. On the homepage of Microsoft Designer, you will see a lot of features. Among them, you will find the Remove Background tab. Click on Try it to remove the background.

Now, upload the image you want to remove the background of, by clicking on the Upload from this device.

Click on Upload after you have selected the image. It will directly open the background removed image from what you have uploaded. If you are unsatisfied with the output, click on Restore original at the top of the image. Tweak a few settings and click on the Remove background option that you see after restoring the original.

After removing the background, Microsoft Designer will suggest a few ideas on how to make the image more attractive or use it to create designs in the Ideas panel on the right side. Click on any of them to begin and work on that idea.
How to generate a brand kit on Microsoft Designer
One of the attractive features of Microsoft Designer is the ability to create a brand kit from scratch and use it in later designs without spending much time on creating it again. To generate a brand kit on Microsoft Designer, click on Generate beside Brand Kit Creator on the homepage.

It will open an overlay to generate a brand kit. Enter your brand name and its description within 30 words in the text boxes under Generate a brand kit with AI and click on Generate. It will show you three kits based on your description beside it in a few seconds. Click on the one you like to customize it.

You can customize the AI-generated brand kit with your logo, fonts, and color. To upload your logo, click on Upload your logo under the Logo tab. Similarly, use the Fonts and Colors tab to customize them. After customizing the brand kit, you may download Logo, Brand card, or Full brand kit onto your PC by clicking on the Download button.

You can save the brand kit to your Designer account by clicking on Save brand to use them in your designs.
How to create social media posts on Microsoft Designer
Since Microsoft Designer is deemed to be a great alternative to Canva with AI features to generate designs for social media, let’s see how we can create designs for social media.
To get started, scroll down on the homepage to find the Designs for social media and more section. You will see templates with preset sizes to suit various social media platforms. Choose a template by clicking on it.

It will create a blank page in the size you have selected. You will find a lot of templates on the left side of the blank canvas. Go through them and click on any of the templates to apply them to the canvas. If you want to begin from scratch, click on My media to upload your images and Visuals to use free images, graphics, and videos, or generate an image from your text description. Or you can just apply the brand kit you have already created by clicking on the Brand kit button. Once you are done with the images and templates, you can add text using the Text button.

After creating the design, click on the Download button at the top-right to save the design to upload on social media. If you want to generate captions and hashtags using AI, click on Try it in the Download options.

After finalizing the design, you can reuse the same design for other social media platforms by clicking on the Resize button at the top bar that appears. You can select the sizes that appear and resize the design for every social media platform.

The resize options include posts, stories, ads, sponsored content, covers, etc. for all the major social media platforms.
Read: Microsoft Designer Keyboard not pairing or working
Create images and animations with text descriptions in Designer
Microsoft Designer lets you generate images as well as animations with the help of a simple text description.
It comes with a dedicated Image Creator tool using which you can create your images just by describing them. Here’s how:
First, open designer.microsoft.com/image-creator in a web browser.

Now, in the text box, enter an appropriate description of the image you want to create. For example, a gorilla drinking coffee from the 1800s, a living room with aesthetics from the 1700s, etc.
Next, press the Generate button and let it create the image as per your description.
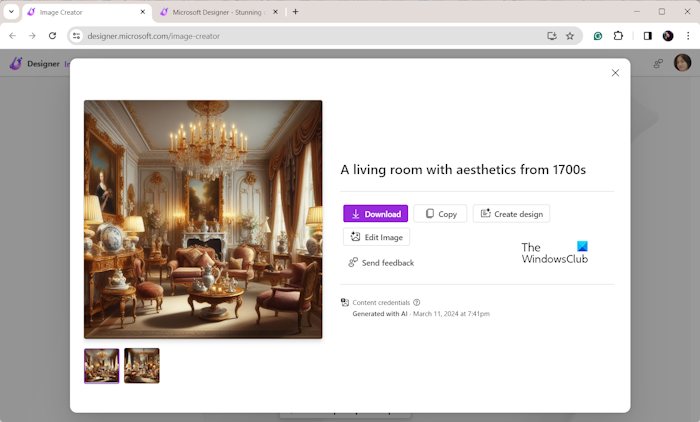
When done, it will show you multiple image results. You can select the one you want and then download it to your computer.
It also provides you the flexibility to edit the resulting image. Click on the Edit Image button and then start editing it in the dedicated editor window.
You can apply basic editing like adjusting brightness, contrast, sharpness, etc., adding filters to the image, cropping the image, and inserting text into the image.
Once the image is edited, you can download it to your PC.
Create an animated graphic in Designer
Besides static images, it also lets you generate animated graphics by giving a text description. For that, you will be required to use words like “motion”, “animated design”, “animation”, etc. in your description.
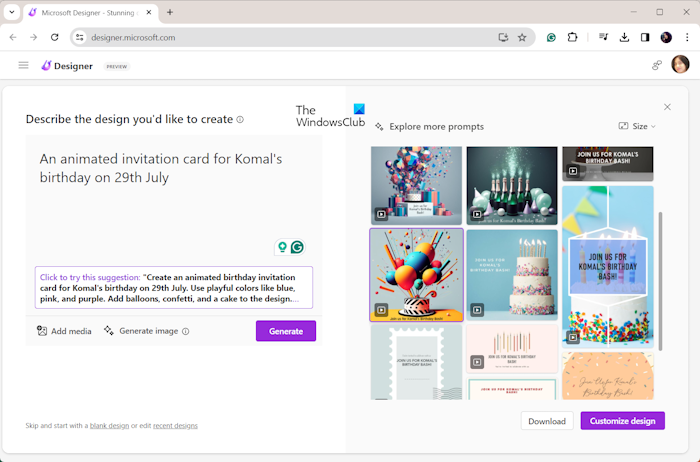
For example, if I want to create an animated invitation for my birthday party, the description will be something like “An animated invitation card for Komal’s birthday on 29th July.” Likewise, you can use a similar description for the same topic.
It will create multiple animations based on your description and show you the results. You can set the size of the animation as landscape, portrait, or square as per your requirement.
To save a generated animation, you can click on the Download button and save it in MP4 format. Apart from that, you can also edit a particular design by clicking on the Customize Design button.
TIP: How to use Image Creator and Microsoft Designer in Edge?
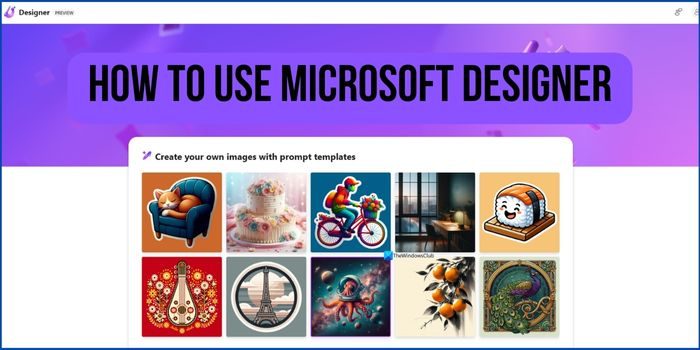
Use Microsoft Designer Prompts to generate images
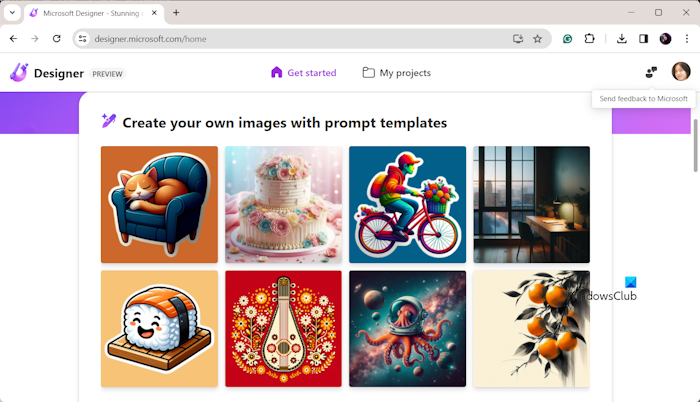
Microsoft Designer provides some pre-defined prompts that you can edit to quickly create your designs.
You can find a dedicated “Create your own images with prompt templates” section under which there are various graphics with different prompts. You can select the desired graphic and then edit its prompt as per your need to create a completely different graphic.
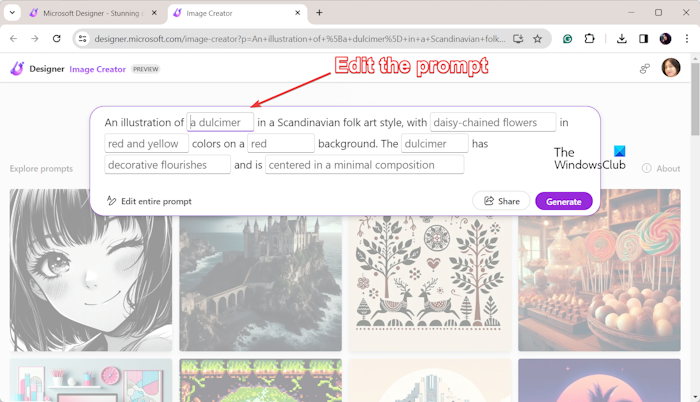
Change the description as required and then press the Generate button. If you want to edit the whole prompt, click on the Edit entire prompt button and then change the whole description accordingly.
It will generate multiple designs corresponding to your description that you can download or edit.
Read: Best free AI Logo Generator Tools.
Upload your images to Designer
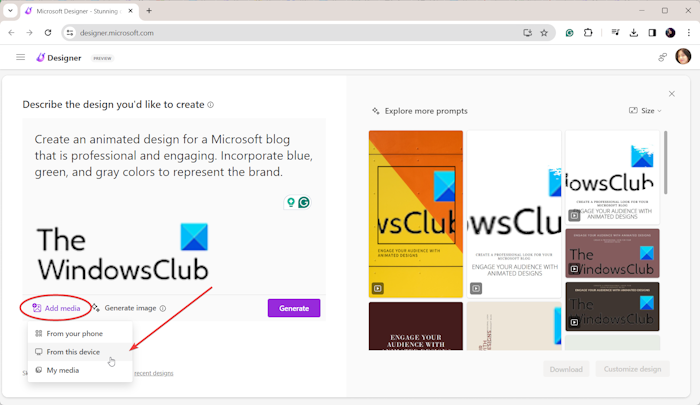
You can also upload your images and Microsoft Designer will automatically create a design containing the image. Here’s how you can do that:
First, open its Design Creator and then press the Add Media button in the opened prompt.
Now, you can upload the source image from your phone, device, or your media library.’
After that, enter the description of the image in the text box and tap on the Generate button.
It will now create multiple designs with your image in it. You can select the one you want to use and then customize it according to your needs. Afterward, you can save the final version in a supported format.
Read: Best AI tools for Designers.
I hope this post helps you get started with Microsoft Designer and create professional AI designs quickly. It is also integrated with Microsoft Office apps to create designs instantly.
Is Microsoft Designer free to use?
Yes, the Microsoft Designer (Preview) app is free to use currently. As of now, the app is in preview mode and Microsoft is improving the app based on the user feedback. You may be required a paid Microsoft subscription in the future to use some of its features.
How do I activate Microsoft Designer?
You can just visit the Microsoft Designer website and start using it even without logging in to create temporary designs. If you want to save designs for later usage or repurpose them, sign up or sign in with your Microsoft account and create designs. Currently, Microsoft Designer is available for free with all the features for everyone.
Who can use Microsoft Designer?
Microsoft Designer is free for all to use. However, Microsoft restricts the use of Microsoft Designer for trade or commerce purposes as of now. This may change at later stages when they make it a freemium tool like Clipchamp or any other Microsoft tool. As long as you adhere to free and fair usage of AI tools, there will be no issues.
Related read: How to create AI Images using Cocreator in the Paint app.